IRKit service has been terminated.
Please check https://maaash.jp/2022/04/deprecating-irkit/ in Japanese or in English
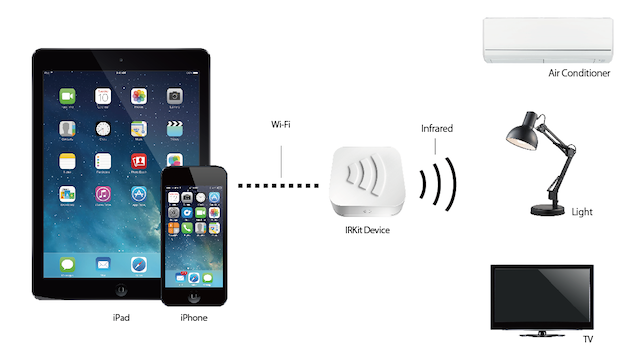
What's IRKit
IRKit is a Wi-Fi enabled Open Source Infrared Remote Controller device.
Home electronics with an infrared remote, like air conditioners, TVs, lights can be controlled using iPhone, iPad, Android phones via IRKit.
When you want to take a photo, chat with someone, you choose an app from AppStore. A simple focused app, a beautifully designed app, a full featured app, there're plenty of apps for you. But there were not much options when you want to control your home electronics.
You know you'll use a smartphone app to control your home electronics. IRKit is a device that helps to bring that future.
Buy IRKit on Amazon.co.jp (ships inside Japan) or SWITCHSCIENCE (Worldwide shipping) .
IRKit works with IRKit's official iOS app, IRKit's official Android app and you can easily create iOS apps to send IR signals to control home electronics using IRKit iOS-SDK .
You can create apps for example that does:
- Use location, turns on air conditioner when you arrive near your home.
- Press one button to turn off all your home electronics when you leave home.
- Connect with Facebook, and automatically change your TV's channel to which your friend is watching.
You can also use JavaScript to send IR signals,
or use curl on Terminal to send IR signals
IRKit itself runs a HTTP server.
You can POST JSON formatted IR signal to it to send IR signals.
When you're not in the same Wi-Fi network, you can POST to our server on internet to send IR signals also.
IRKit is a Arduino derivative Open Source hardware.
Open pins are pulled out, so you can add some components like temperature sensor or brightness sensor and modify IRKit's firmware, write it into IRKit using Arduino IDE to make it more smart.
So, what did you hate about your remote controller?
How would you like to control it?
IRKit iOS SDK
It's as simple as:
#import <IRKit/IRKit.h>

[_signal sendWithCompletion:^(NSError *error) {
    NSLog( @"sent with error: %@", error );
}];
See more on irkit/ios-sdk
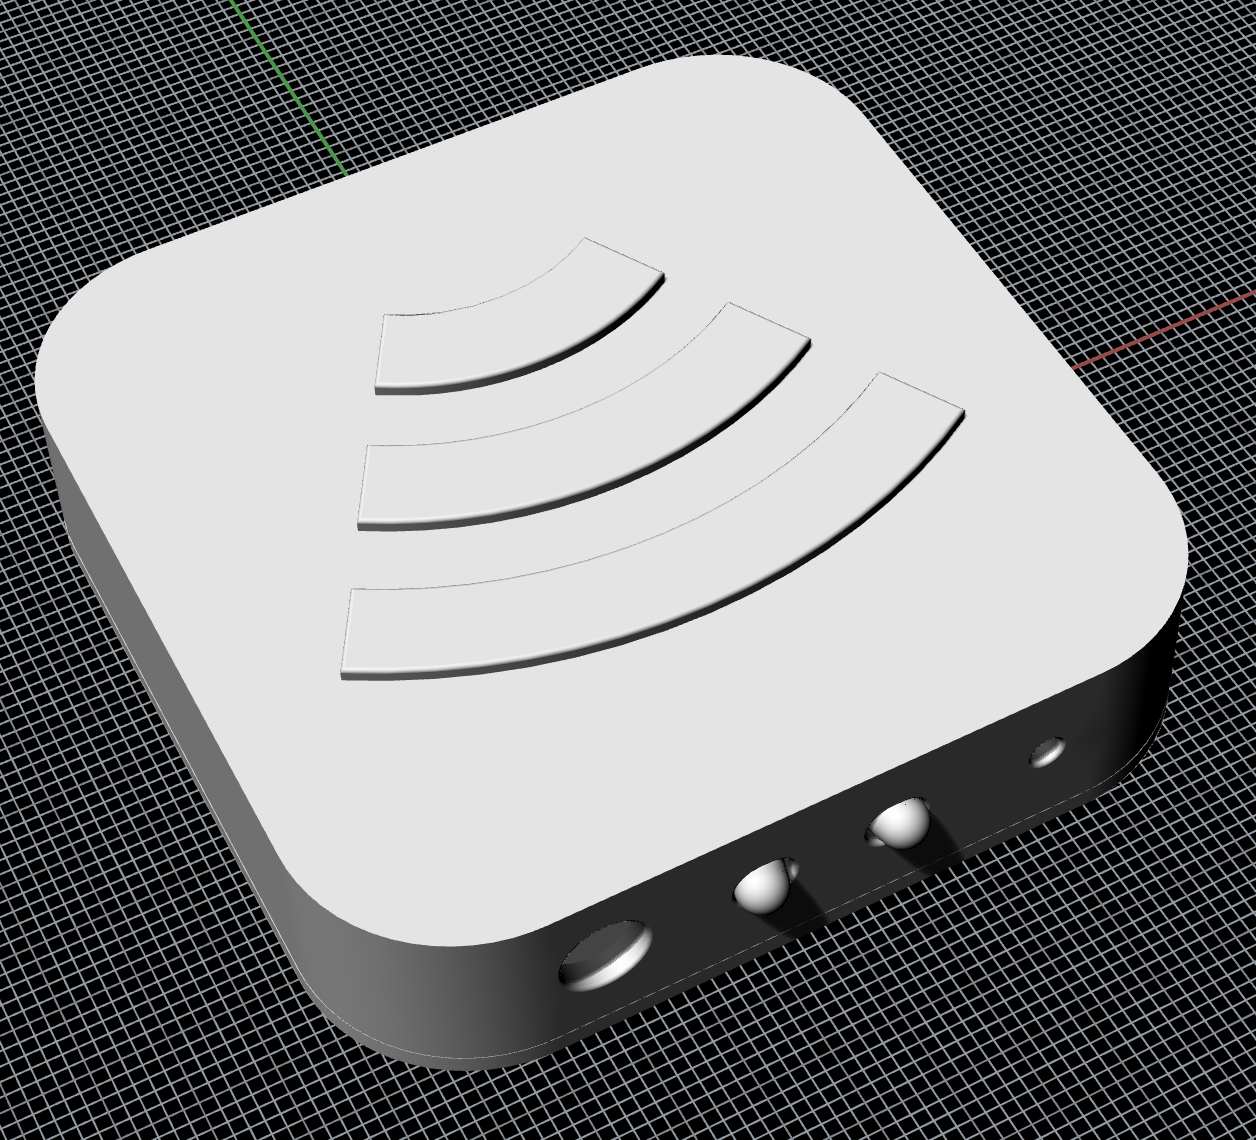
IRKit Device Hardware

See more on irkit/device/hardware
IRKit Device Firmware
IRKit Device Case
See more on irkit/device/case
IRKit Device HTTP API
IRKit device uses Bonjour to be discovered.
% dns-sd -B _irkit._tcp
Browsing for _irkit._tcp
DATE: ---Sat 28 Dec 2013---
23:12:55.623  ...STARTING...
Timestamp     A/R    Flags  if Domain               Service Type         Instance Name
23:12:55.768  Add        2   4 local.               _irkit._tcp.         irkitd2a4
^C

% dns-sd -G v4 irkitd2a4.local
DATE: ---Sat 28 Dec 2013---
23:16:29.698  ...STARTING...
Timestamp     A/R Flags if Hostname                               Address                                      TTL
23:16:29.818  Add     2  4 irkitd2a4.local.                       10.0.1.2                                     10
^C
After you get IRKit's IP address, access it's HTTP API.
* If you use a HTTP client that uses Bonjour to resolve .local hostnames, you don't need above step.
GET /messages
Get latest receive IR signal.
% curl -i "http://10.0.1.2/messages" -H "X-Requested-With: curl"
HTTP/1.0 200 OK
Access-Control-Allow-Origin: *
Server: IRKit/2.1.3.13.gbe33d36
Content-Type: text/plain

{"format":"raw","freq":38,"data":[18031,8755,1190,1190,1190,3341,1190,3341,1190,3341,1190,1190,1190,3341,1190,3341,1190,3341,1190,3341,1190,3341,1190,3341,1190,1190,1190,1190,1190,1190,1190,1190,1190,3341,1190,3341,1190,1190,1190,3341,1190,1190,1190,1190,1190,1190,1190,1190,1190,1190,1190,1190,1190,1190,1190,1190,1190,3341,1190,3341,1190,3341,1190,3341,1190,3341,1190,65535,0,9379,18031,4400,1190]}
IRKit clear's it's IR signal memory after responding to GET /messages request.
So you won't GET the same IR signal twice.
POST /messages
Send IR signal.
% curl -i "http://10.0.1.2/messages" -H "X-Requested-With: curl" -d '{"format":"raw","freq":38,"data":[18031,8755,1190,1190,1190,3341,1190,3341,1190,3341,1190,1190,1190,3341,1190,3341,1190,3341,1190,3341,1190,3341,1190,3341,1190,1190,1190,1190,1190,1190,1190,1190,1190,3341,1190,3341,1190,1190,1190,3341,1190,1190,1190,1190,1190,1190,1190,1190,1190,1190,1190,1190,1190,1190,1190,1190,1190,3341,1190,3341,1190,3341,1190,3341,1190,3341,1190,65535,0,9379,18031,4400,1190]}'
HTTP/1.0 200 OK
Access-Control-Allow-Origin: *
Server: IRKit/2.1.3.13.gbe33d36
Content-Type: text/plain- When using curl.exe in Windows, don't forget to escape double quotes. Use following escaping:
-d "{\"format\":\"raw\",\"freq\":38,\"data\":[...]}"
POST /keys
Get a clienttoken
Pass clienttoken over to next request: POST /1/keys to get clientkey and deviceid.
See IRKit Internet HTTP API for details.
% curl -i "http://10.0.1.2/keys" -H "X-Requested-With: curl" -d ''
HTTP/1.0 200 OK
Access-Control-Allow-Origin: *
Server: IRKit/2.1.3.13.gbe33d36
Content-Type: text/plain

{"clienttoken":"XXXXXXXXXXXXXXXXXXXXXXXXXXXXX"}
POST /wifi
IRKit connects to your home Wi-Fi accesspoint.
To connect, you have to pass your home Wi-Fi accesspoint's security settings (WPA2/WEP/NONE), SSID and password to IRKit.
To pass those Wi-Fi information to IRKit, you first connect to IRKit's own Wi-Fi accesspoint.
Serialize Wi-Fi information along with the devicekey, and put the serialized string in the request body to POST /wifi.
Serializer is implemented in JavaScript: keyserializer test and Objective-C: - (NSString *)morseStringRepresentation.
% curl -i "http://192.168.1.1/wifi" -H "X-Requested-With: curl" -d '8/49524B6974546573746572/70617373776F7264/0123456789ABCDEF0123456789ABCDEF/2//////46'
HTTP/1.0 200 OK
Access-Control-Allow-Origin: *
Server: IRKit/2.1.3.13.gbe33d36
Content-Type: text/plain
After POST /wifi responds with HTTP status code 200, request against POST /1/door to check if IRKit successfully connected to Internet.
IR signal JSON represntation
IR signal JSON representation looks like above.
JSON object has following keys.
| Key | Description |
|---|---|
| format | "raw" only |
| freq | IR sub-carrier frequency. 38 or 40 only. [kHz] |
| data | IR signal consists of ON/OFF of sub carrier frequency. IRKit measures On to Off, Off to On interval using a 2MHz counter. data value is an array of those intervals |
IRKit Internet HTTP API
IRKit Device HTTP API can be accessed when HTTP client is in the same Wi-Fi network.
If the HTTP client is not in the same Wi-Fi network, you can request against our server on Internet, to send IR signals.
Overview
When using IRKit's Internet server, you'll need following 2 request parameters.
These are used to know who sent this request, and which IRKit device it's targetted to.
| Name | Description |
|---|---|
| clientkey | key to authenticate itself |
| deviceid | IRKit device identifier. |
To get clientkey and deviceid, the're 2 ways.
If you already have a Wi-Fi connected IRKit device,
use POST /keys against IRKit device to get a clienttoken, and pass it to our server on Internet using POST /1/keys.
If you already have IRKit, and you want to use it more aggressively, use this course.
If you have an IRKit device not connected to Wi-Fi and not able to use our official apps (iOS/Android) or SDKs(iOS/Android),
for example if you want to create a SDK for WindowsPhone, use following course.
POST /1/clients to get a clientkey,
and POST /1/devices to get a devicekey, deviceid
and finally pass devicekey along with your home Wi-Fi access point's information to IRKit, via it's own Wi-Fi access point. (See POST /wifi)
devicekey is used by IRKit device to authenticate itself.
POST /1/keys
Get deviceid.
If optionally provide clientkey request parameter, provided clientkey and deviceid's relationship will be saved on server.
With deviceid, you can send IR signals using POST /1/messages
and receive IR signals using GET /1/messages.
curl -i -d "clienttoken=XXXXXXXXXXXXXXXXXXXXX" "https://api.getirkit.com/1/keys"
HTTP/1.1 200 OK
Server: ngx_openresty
Date: Tue, 07 Jan 2014 08:46:06 GMT
Content-Type: application/json; charset=utf-8
Content-Length: 94
Connection: keep-alive
X-Content-Type-Options: nosniff

{"deviceid":"XXXXXXXXXXXXXXXXXXXXXXXXXXXXXX","clientkey":"XXXXXXXXXXXXXXXXXXXXXXX"}
Request Parameters
| Name | Required | Description |
|---|---|---|
| clienttoken | o | Get one from POST /keys |
| clientkey | x | see Overview. If optionally provided, Internet server will remember relationship between clientkey and IRKit device. |
Response JSON keys
| Name | Description |
|---|---|
| deviceid | see Overview |
| clientkey | see Overview |
POST /1/messages
Send IR signal through IRKit device identified by deviceid.
curl -i "https://api.getirkit.com/1/messages" \
     -d 'clientkey=XXXXXXXXXXXXXXXXXXXXXXXXXX' \
     -d 'deviceid=XXXXXXXXXXXXXXXXXXXXXXXXXXX' \
     -d 'message={"format":"raw","freq":38,"data":[18031,8755,1190,1190,1190,3341,1190,3341,1190,3341,1190,1190,1190,3341,1190,3341,1190,3341,1190,3341,1190,3341,1190,3341,1190,1190,1190,1190,1190,1190,1190,1190,1190,3341,1190,3341,1190,1190,1190,3341,1190,1190,1190,1190,1190,1190,1190,1190,1190,1190,1190,1190,1190,1190,1190,1190,1190,3341,1190,3341,1190,3341,1190,3341,1190,3341,1190,65535,0,9379,18031,4400,1190]}'
HTTP/1.1 200 OK
Server: ngx_openresty
Date: Tue, 07 Jan 2014 08:52:24 GMT
Content-Type: text/html; charset=utf-8
Content-Length: 0
Connection: keep-alive
X-Content-Type-Options: nosniff
Request Parameters
| Name | Required | Description |
|---|---|---|
| clientkey | o | see Overview |
| deviceid | o | see Overview |
| message | o | see IR signal JSON representation |
GET /1/messages
Get latest received IR signal.
This request is a long polling request.
Provide clear=1 parameter to clear IR signal receive buffer on server.
When IRKit device receives an IR signal, device sends it over to our server on Internet, and server passes it over as response.
Server will respond with an empty response after timeout.
When you want to receive an IR signal, 1st request should add clear=1 parameter, and following requests after timeout should not.
Use deviceid and hostname in response to distinguish which IRKit device received the IR signal in response.
curl -i "https://api.getirkit.com/1/messages?clientkey=XXXXXXXXXXXXXXXX&clear=1"
HTTP/1.1 200 OK
Server: ngx_openresty
Date: Tue, 07 Jan 2014 09:03:59 GMT
Content-Type: application/json; charset=utf-8
Content-Length: 481
Connection: keep-alive
ETag: "-19571392"
X-Content-Type-Options: nosniff

{"message":{"format":"raw","freq":38,"data":[18031,8755,1190,1190,1190,3341,1190,3341,1190,3341,1190,1190,1190,3341,1190,3341,1190,3341,1190,3341,1190,3341,1190,3341,1190,1190,1190,1190,1190,1190,1190,1190,1190,3341,1190,3341,1190,1190,1190,3341,1190,1190,1190,1190,1190,1190,1190,1190,1190,1190,1190,1190,1190,1190,1190,1190,1190,3341,1190,3341,1190,3341,1190,3341,1190,3341,1190,65535,0,9379,18031,4400,1190]},"hostname":"IRKitD2A4","deviceid":"FBEC7F5148274DADB608799D43175FD1"}
Request Parameters
| Name | Required | Description |
|---|---|---|
| clientkey | o | see Overview |
| clear | x | Clear IR receive buffer on server |
Response Parameters
| Name | Description |
|---|---|
| message | see 赤外線信号を表すJSONについて |
| hostname | IRKit device hostname. Add .local suffix to request IRKit Device HTTP API if client is in the same Wi-Fi network |
| deviceid | see Overview |
POST /1/clients
Get a clientkey.
curl -i -d "apikey=XXXXXXXXXXXXXXXXXXXXX" "https://api.getirkit.com/1/clients"
HTTP/1.1 200 OK
Server: ngx_openresty
Date: Tue, 07 Jan 2014 09:26:52 GMT
Content-Type: application/json; charset=utf-8
Content-Length: 48
Connection: keep-alive
X-Content-Type-Options: nosniff

{"clientkey":"XXXXXXXXXXXXXXXXXXXXXXXXXXXXX"}
Request Parameters
| Name | Required | Description |
|---|---|---|
| apikey | o | see POST /1/apps |
Response Parameters
| Name | Description |
|---|---|
| clientkey | see Overview |
POST /1/devices
Get devicekey and deviceid.
curl -i "https://api.getirkit.com/1/devices" -d "clientkey=XXXXXXXXXXXXXXXXXXXXXXXXXXXXXXXX"
HTTP/1.1 200 OK
Server: ngx_openresty
Date: Tue, 07 Jan 2014 09:30:46 GMT
Content-Type: application/json; charset=utf-8
Content-Length: 94
Connection: keep-alive
X-Content-Type-Options: nosniff

{"devicekey":"XXXXXXXXXXXXXXXXXXXXXXXXXXXXXXX","deviceid":"XXXXXXXXXXXXXXXXXXXXXXXXXXXXXX"}
Pass devicekey to IRKit device using Morse code or IRKit itselves Wi-Fi access point.
Request Parameters
| Name | Required | Description |
|---|---|---|
| clientkey | o | see Overview |
Response Parameters
| Name | Description |
|---|---|
| devicekey | see Overview |
| deviceid | see Overview |
POST /1/door
After you send your home Wi-Fi accesspoint's information along with a devicekey to IRKit through IRKit's own accesspoint (POST /wifi), use POST /1/door to check if IRKit had successfully connected to your home Wi-Fi accesspoint and to our server on Internet.
This request is a long polling request.
Our server on Internet will immediately respond when server confirms IRKit is connected,
otherwise you'll receive an empty response after timeout.
curl -i "https://api.getirkit.com/1/door" \
     -d 'clientkey=XXXXXXXXXXXXXXXXXXXXXXXXXX' \
     -d 'deviceid=XXXXXXXXXXXXXXXXXXXXXXXXXXX'
HTTP/1.1 200 OK
Server: ngx_openresty
Date: Wed, 01 Jan 2014 17:04:59 GMT
Content-Type: application/json; charset=utf-8
Content-Length: 24
Connection: keep-alive
X-Content-Type-Options: nosniff

{"hostname":"IRKitXXXX"}
Request Parameters
| Name | Required | Description |
|---|---|---|
| clientkey | o | see Overview |
| deviceid | o | see Overview |
Response Parameters
| Name | Description |
|---|---|
| hostname | Bonjour hostname (ex: #{hostname}.local), used by HTTP clients connected to the same Wi-Fi accesspoint. |
POST /1/apps
Get apikey.
curl -i -d "email={ your valid email }" "https://api.getirkit.com/1/apps"
HTTP/1.1 200 OK
Server: ngx_openresty
Date: Wed, 01 Jan 2014 17:04:59 GMT
Content-Type: application/json; charset=utf-8
Content-Length: 92
Connection: keep-alive
X-Content-Type-Options: nosniff

{"message":"You will receive an email shortly, please click the URL in it to get an apikey"}
Request Parameters
| Name | Required | Description |
|---|---|---|
| o | Developer email address |
Response Parameters
| Name | Description |
|---|---|
| message | - |